Wednesday, December 17, 2008

Smells like Christmas...


If you were to ask my mom, Christmas isn't Christmas without snickerdoodles. These are her favorite cookie, so when I went on my baking adventure 2008, I had to include them for her. I made 7 types of cookies, all with different flavors and textures. The simplest of these was the snickerdoodle. With just a simple coating in cinnamon sugar before baking, they have a subtle sweetness that matches their chewy texture beautifully.

Classic Snickerdoodles

1 1/2 cups sugar
1/2 cup butter; softened
1/2 cup shortening
2 eggs
2 3/4 cups flour
2 teaspoons cream of tartar
1 teaspoon baking soda
1/4 teaspoon salt

1/4 cup sugar
2 teaspoons cinnamon

  • Heat oven to 400 degrees
  • Mix sugar, butter, shortening and eggs in a large bowl. Stir in flour, cream of tartar, baking soda and salt.
  • Shape dough into 1 1/4 inch balls. Mix 1/4 cup sugar and cinnamon. Place 2 inches apart on an ungreased cookie sheet.
  • Bake 8 to 10 minutes or until set. Remove from cookie sheet and cool on wire rack.

Tuesday, December 16, 2008

Cookies cookies everywhere...

These cookies go by many different names Russian tea cookies, pecan balls, or in my family, snowballs. All of the recipes are very similar and they are topped with the unmistakable adornment of crisp white powdered sugar. The look of a powdered doughnut draws in kids and the unmistakable flavor hooks them for life. The cookie is slightly dry, and barely sweet, and definitely not overwhelming. My cousins have been known to eat entire tins before realizing what they were doing, or being caught by their parents!

Grandma's Snowballs
This recipe is written exactly how my grandmother wrote it on her recipe card...Not my style, but it is her recipe after all...

Beat well:
1 egg
1 teaspoon vanilla extract

Cream together:
Egg mixture
1 cup butter or crisco
1 1/2 cup powdered sugar; sifted

Sift together:
2 1/2 cups flour
1 teaspoon baking soda
1 teaspoon cream of tartar
1/4 teaspoon salt

Add:
1 to 1 1/2 cups chopped walnuts

Chill 30 Minutes in refrigerator

Form into 1 inch balls

Preheat oven to 400 degrees

Bake 8 to 10 minutes

Roll in powdered sugar immediately out of oven; Caution will be hot!!

Cool and roll again in powdered sugar

Monday, December 15, 2008

Cookie Spectacular.


I truly love the holiday season. Everything about it makes me happy. It is the time of year when I get to spend copious amounts of time with my family, bake obscene amounts of cookies, and finish the day with a wonderfully delicious Harpoon Winter Warmer. I really love that beer, I look forward to it all year long.

For my first of the many holiday cookie posts to come, I'm going to highlight chocolate chip cookies. This recipe was adapted from all recipes. This dough is by far the best cookie dough any of us have
ever had.

Chocolate chip cookies - Makes 3 Dozen (we got closer to 5 dozen worth of dough, but we actually produced 4 dozen cookies
)

Ingredients:

  • 2 1/4 cups all purpose flour
  • 1 teaspoon baking soda
  • 1 cup butter, softened (I like to leave my butter out overnight if I know I'll be baking the next day)
  • 3/4 cup brown sugar
  • 1/4 cup white sugar
  • 1 (3.4 ounce) package jell-o brand vanilla instant pudding mix
  • 2 eggs
  • 1 teaspoon vanilla extract
  • 2 cups chocolate chips
Directions:
  • Preheat the oven to 350 degrees
  • In a large bowl cream together butter and both sugars. Blend in instant pudding mix. Add eggs and vanilla extract.
  • Mix in flour and baking soda.
  • Once blended stir in chocolate chips.
  • Bake for 10 to 12 minutes, until edges are slightly browned.

Tuesday, December 9, 2008

Recipes to Rival Month 1

Squash soup is what was on the menu this month over on recipes to rival!
The requirements were that we had to make our own stock, something I had never done, use squash, and use a vanilla cream garnish of some sort. I was really excited when I read the challenge because I had been wanting to make squash soup since fall began. This finally gave me the perfect excuse to just do it already! I liked the leniency of this specific challenge because as long as I made my own stock and used a vanilla garnish, i could use whatever squash soup recipe I wanted. I ended up making up my own after reading and getting inspired by other recipes.

I started on the Tuesday before Thanksgiving by making the stock and roasting the squash. I used my two favorite squashes, butternut and acorn. They're so flavorful and naturally sweet.

Once my stock had boiled away for hours and my squash was wonderfully tender, both went into the refrigerator overnight.

The Wednesday before Thanksgiving in my family is what we call pie day. All of the women come over to my mom's house and we bake all the pies and we do a ton of prep work for the big day. I made the soup for dinner for everyone, it was delicious. Everyone liked it. I uses the butternut squash, acorn squash, an apple and a pear. I used an immersion blender to smooth the squash, apple, and stock together.
Once smooth, I added some apple cider, salt, pepper, and nutmeg. I tasted and tasted and tasted and couldn't figure out what to add in order to make it not taste like baby food. After some googling and searching, I decided to add 6 tablespoons of butter. That fixed my problem perfectly. It was amazing.


I then made whipped cream with vanilla bean. That was so delicious. I actually used what I needed for the soup, and then sweetened it for use on the pumpkin pies on Thanksgiving. So yummy!

I garnished with the vanilla whipped cream and some sage leaves.

Thursday, December 4, 2008

DB: Caramel Cake!


I know I'm a little bit late with my Caramel Cake post, but Thanksgiving was just crazy!

This month's challenge was Caramel Cake with Caramelized Butter Frosting, by Shuna Fish Lydon. The host this month was Dolores from Culinary Curiosity with help from Alex from Blondie and Brownie, Jenny from Foray into Food, and Natalie from Gluten-a-Go-Go.

I was a little nervous about this month's recipe, simply because in the challenge there was a comment about how this cake it truly about baking. I was excited about that because I obviously like to bake, and I like a challenge, hence joining the group...However, I was nervous as this was the first time I took on a recipe that I thought to be challenging.

The recipe was very detailed with many different steps. We had to make a caramel syrup, brown butter, make frosting, and make a cake. The syrup was the part that I found to be the most difficult. I've made hard candy before, in the form of candy canes, but I had never made caramel. The recipe warned to wear long sleeves when pouring the water into the caramel, I ignored the long sleeves, but poured the water in with an oven mitt on my hand. Oh Boy! I was SO glad I made that decision. It really exploded. It was insane. I whisked it a little, and took it off the burner and let it cool. I read the recipe wrong and accidentally added like a cup of the syrup when it only called for 1/3 of a cup. oops. The cake still tasted pretty good, but it was a little overwhelmingly sweet, but that was to be expected when you mess up the recipe!

I made a 9x9 inch square cake, and it cooked for a relatively short time, like 30 minutes. It smelled delicious! While it was cooking I browned the butter and made the frosting. That part was truly delicious. I loved the brown butter, I thought it was delicious and added a great nuttiness to the frosting which balanced my excessively sweet cake nicely.
I loved the cake, and it would have been truly delicious if I had added the correct amount of syrup.

Wednesday, November 12, 2008

Have your cake...

After caking the cake decorating classes earlier this year, I have become the official cake maker for all family functions. I love this job, I love trying to think of what everyone will like and seeing their faces after they see my creations, that are hopefully everything they hoped for.
September and October are insanely busy with birthdays and anniversaries in my family, so not everyone got cakes, which made me a little sad, but I wouldn't have left my kitchen between 9/20 and 10/29! There are 20 birthdays/anniversaries in that time!
What I was able to do is make cakes for all my cousins who fall in there, and then a separate one for our September/October birthday celebration that we have.
This was my Grandfather's cake, he turned 76 this year. He is a huge country music fan, and a good old southern boy. He adored the simplicity of it, and also the cowboy hat theme. His cake was one layer of vanilla and one of chocolate, filled with buttercream frosting.

This cake was for my cousin Danielle. I'm really close with both her and her twin sister, Devan. Since I started with the decorating, she had been telling me precisely what she wanted, the doll cake that they make. She wanted it to look like Belle from Beauty and the Beast. I didn't have much creative license on this one, as she was very specific, but she was superbly happy with the results. Danielle is a chocolate freak! Her cake was chocolate chocolate chocolate. Topped with a thin layer of vanilla (yellow) buttercream.

Then there is Devan's cake. She had no idea what she wanted. I looked back through my cake pictures then the idea hit me. She loved these two cakes I made way back when I started. Her favorite cake that I've made is actually my first cake. It had star tipped circles on it. Then she liked the cake I made for my own graduation party cake. It was insanely bright colors. Her favorite color is yellow and she is the most energetic 15 year old you'll ever meet. I love that about her, so I tried to make the cake feel like her. I think I was pretty successful, and she really loved it. Her cake was vanilla with vanilla frosting, and covered in mmf.

Tuesday, November 11, 2008

DB Pizza take 2!

My pizza was a resounding success the first time, but my immediate family got a little mad at me for sharing it with my cousins instead of them. So I remade it for my mom, sister and her boyfriend.
I have to say, I found the dough to be slightly fool proof, as I ran out of bread flour half way through and started using all purpose flour, and still had the same delicious results as I had in the first go around. I love the dough recipe, and will never buy dough again!
This time we had:
BBQ Chicken Pizza. This had Sweet Baby Ray's honey bbq sauce, sauteed chicken, thinly sliced red onions, and mozzarella cheese.

Pepperoni Pizza

Plain old cheese pizza

Peppers and Onions Pizza

Everyone enjoyed it the second time around too. The BBQ chicken was by far the winner this time. However, that is always the winner around here, no matter how the pizza is prepared!

I think that face means that Jenni liked it, what do you think?

Monday, November 10, 2008

When the lights go out...

A few weeks ago here in New York we had a Saturday full of miserable weather, it didn't start out so bad, in fact it started out as a relatively normal northeast autumn day. The sky was blue, with a brisk breeze blowing colorful leaves around. Unfortunately that brisk breeze was bringing in a storm that would eventually leave us without power for more than six hours.... While the rain wasn't a huge surprise to us, as the weathermen had predicted it quite explicitly, the wind was quite unexpected.
Based on the predictions of the weathermen, Precious and I had decided to make chicken and dumplings for dinner. A delicious, warm and cozy food. Growing up with a very picky eater for a father, I had never before tried to cook or eat it. Presh says that the only recipe that she likes for chicken and dumplings is the Cooks Illustrated version. She saved it to her computer a few years ago when she discovered it, and I have been unable to relocate it on their website, but we used the version that she had saved.
Everything started out fine, we started cooking sometime around 4 pm while her 5 year old was contently playing his Nintendo DS and her 4 month old was snoozing soundly in his Stokke. (I'll post more on that later - as I think it is by far the best baby "supply" she has!) We teamed up and chopped and chopped all of the vegetables. The recipe makes a ton of food, we had enough for 3 adults for dinner the first night, then 4 adults the next night. So we finely chopped carrots, celery and onion, a mirepoix if I may. While she cleaned up after our chopping extravaganza, I went ahead and started browning our chicken thighs. We bought half with bones and skin and half without, in a futile effort to make this meal slightly better for you, and by that I mean that is what the grocery store had available.

Once all the chicken was browned and removed from the pot, we drained off all of the excess chicken fat and tossed in all of the nicely chopped vegetables and sauteed until tender. This may not seem like a difficult process, but if you have ever tried to lift a LeCreuset pot, you'd understand that a 13 qt french oven pot is nearly impossible to lift above elbow level to attempt to drain off extra fat!

Once all of our vegetables were nice and soft we added in some flour to make a nice non-floury tasting roux.

The flour turns this gorgeous light brown color, and then you add in the chicken stock and whole milk. Bring it to a boil and plop all of the nicely (now cold) browned chicken back into the pot.

For us, this is when the drama started, the power went out! Luckily, the stove is gas powered, and it was already on, so we could finish cooking the dinner. I do know that you can light a gas stove with a match when there isn't power, but with an infant in the house, I wasn't going to try it for the first time! The good news is that once the chicken was nestled soundly in the cooking liquid, it simply had to simmer away for the next two hours.

After two hours of simmering, and numerous flashlight lit stirrings, we pulled out all of the chicken and shredded it. Then we made the dumplings and dumped the shredded chicken into the pot again and topped with the dumplings.

I covered it and we let it simmer for 15 more minutes and then our lantern lit dinner was served!

Brittney really enjoyed the meal, I don't believe she was actually eating at warp speed, I'm willing to bet is has more to do with my lack of abilities with the dslr camera I was playing around with.

I'm thinking the thought going through her mind at this exact moment is, "Julie, I swear if these pictures end up on your blog, I'm going to beat you!" But, alas here they are...She's gorgeous and enjoying my food, I see no wrong!

Zachary did not like the idea of the power outage, nor did he like the chicken and dumplings. Okay, I guess it isn't fair to say that he didn't like the chicken and dumplings, he didn't try them, he didn't like the idea of them either I suppose.

Wednesday, October 29, 2008

My First Daring Bakers Challenge!

October brought my first challenge with the Daring Bakers. It is a group of bakers which issue a challenge once a month, and I've been perusing the blog roll for a while now, and I finally gave in and joined. My first official challenge was the October challenge.

We made pizza! The challenge was to make pizza dough. I was super stoked about this because I've been making home made pizza for the past couple years, just not with making my own dough.

I started making the pizza on Monday night, the recipe said that the dough had to rest overnight in the refrigerator so for our Tuesday night debate and pizza party. I made pizza for 5 pizza, and we had about one 10 inch pizza left over. We were all beyond stuffed after eating, but it was truly spectacular, which I think is what lead us to eating more than we actually should have!

So on with the results!
These are my dough balls before putting them in the refrigerator to rest over night. They were very non-tacky and maintained their shape nicely.

My disks resting for 2 hours prior to being tossed and baked.

Tossing was more fun than I ever imagined it would be and it was much easier than I anticipated! I'm not sure if it is the recipe, ingredients, or simply method, but this dough was perfectly pliable without being mushy. It had great elasticity!

The plain pizza prior to making its trip to the oven...I made 6 pizzas. Four of them were plain, one was Gorgonzola and pear, and one was ranch flavored. The ranch one was scarfed down by my cousin and her boyfriend before I could even take a picture!

My very beautiful plain cheese pizza straight out of the oven. It was absolutely divine. Wonderfully crunchy crust, with just enough rise to make the crust itself a little chewy, and the perfect crunch through the rest of the pizza.

Gorgonzola, pear and caramelized onions, could it get much better? This pizza was by far the winner of the night. My cousin and her husband are still raving about it!

We obviously thought the recipe was a hit, and I absolutely LOVED being a part of my first daring bakers challenge. My cousin's boyfriend thinks that there should be a new challenge weekly!

So without further ado, the recipe:
  • 4 1/2 Cups (20 1/4 ounces/607.5 g) Unbleached high-gluten (%14) bread flour or all purpose flour, chilled
  • 1 3/4 Tsp Salt
  • 1 Tsp Instant yeast
  • 1/4 Cup (2 ounces/60g) Olive oil
  • 1 3/4 Cups (14 ounces/420g or 420ml) Water, ice cold (40° F/4.5° C)
  • 1 Tb sugar
  • Semolina/durum flour or cornmeal for dusting
1. Mix together the flour, salt and instant yeast in a big bowl (or in the bowl of your stand mixer).

2. Add the oil, sugar and cold water and mix well (with the help of a large wooden spoon or with the paddle attachment, on low speed) in order to form a sticky ball of dough. On a clean surface, knead for about 5-7 minutes, until the dough is smooth and the ingredients are homogeneously distributed. If it is too wet, add a little flour (not too much, though) and if it is too dry add 1 or 2 teaspoons extra water.

3. Flour a work surface or counter. Line a jelly pan with baking paper/parchment. Lightly oil the paper.

4. With the help of a metal or plastic dough scraper, cut the dough into 6 equal pieces (or larger if you want to make larger pizzas).

NOTE: To avoid the dough from sticking to the scraper, dip the scraper into water between cuts.

5. Sprinkle some flour over the dough. Make sure your hands are dry and then flour them. Gently round each piece into a ball.

NOTE: If the dough sticks to your hands, then dip your hands into the flour again.

6. Transfer the dough balls to the lined jelly pan and mist them generously with spray oil. Slip the pan into plastic bag or enclose in plastic food wrap.

7. Put the pan into the refrigerator and let the dough rest overnight or for up to thee days.

DAY TWO

8. On the day you plan to eat pizza, exactly 2 hours before you make it, remove the desired number of dough balls from the refrigerator. Dust the counter with flour and spray lightly with oil. Place the dough balls on a floured surface and sprinkle them with flour. Dust your hands with flour and delicately press the dough into disks about 1/2 inch/1.3 cm thick and 5 inches/12.7 cm in diameter. Sprinkle with flour and mist with oil. Loosely cover the dough rounds with plastic wrap

9. At least 45 minutes before making the pizza, place a baking stone on the lower third of the oven. Preheat the oven as hot as possible (500° F/260° C).

NOTE: If you do not have a baking stone, then use the back of a jelly pan. Do not preheat the pan.

10. Generously sprinkle the back of a jelly pan with semolina/durum flour or cornmeal. Flour your hands (palms, backs and knuckles). Take 1 piece of dough by lifting it with a pastry scraper. Lay the dough across your fists in a very delicate way and carefully stretch it by bouncing it in a circular motion on your hands, and by giving it a little stretch with each bounce. Once the dough has expanded outward, move to a full toss.

11. When the dough has the shape you want (about 9-12 inches/23-30 cm in diameter - for a 6 ounces/180g piece of dough), place it on the back of the jelly pan, making sure there is enough semolina/durum flour or cornmeal to allow it to slide and not stick to the pan.

12. Lightly top it with sweet or savory toppings of your choice.

13. Slide the garnished pizza onto the stone in the oven or bake directly on the jelly pan. Close the door and bake for abour 5-8 minutes.

14. Take the pizza out of the oven and transfer it to a cutting board or your plate. In order to allow the cheese to set a little, wait 3-5 minutes before slicing or serving.

Monday, October 6, 2008

First attempt at babyfood!

Precious' son is 14 weeks old now and is just starting to eat solid foods. She wants to make his baby food in an attempt to expand his palette beyond pizza, chicken on a stick and cheese eggs. We gave it a try for the first time this weekend.
We started by making avocado, butternut squash and applesauce. All three were super simple to make. We simply put the avocado in the blender with a little bit of water. As for the butternut squash and the applesauce, those were baked prior to being put through my food mill. But still super simple! I can't wait to try different flavor combinations and stages of food for him.
Avocado in the blender:
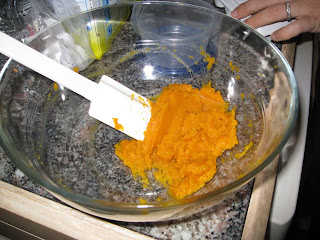
Smushed butternut squash:
Avocado being put into the ice cube trays for freezing:

It was so much fun, and I really can't wait to try more!

Salsa!

End of summer means tomato season, and now that the grocery stores are full of plump, vine ripened, local tomatoes it is hard to not want to come up with methods of using them. Last week I oven roasted plum tomatoes and made tomato sauce from actual tomatoes for the first time. This weekend, Precious and I made and jarred salsa for the first time.
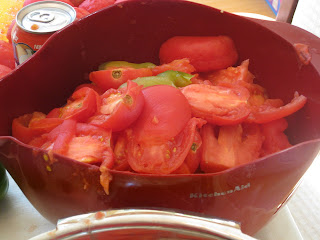
We started with just over 11lbs of plum tomatoes
3 Long hot peppers, 3 Cherry peppers, 3 jalepenos, 4 limes, 10 cloves of garlic
3 bell peppers and 2 sweet onions
The peeling and seeding of the tomatoes was a lot of work!
Then it simmered restlessly for 20 minutes on the stove
Once all done, it had to cool for a couple minutes
While waiting to be jarred...

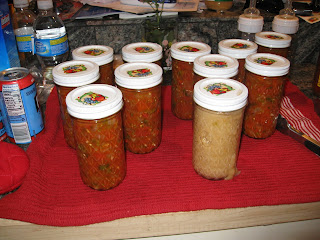
It ended up being 11 jars of delicious salsa, and the 12th is apple sauce that we made for Precious' 14 week old son, Jackson.

Wednesday, May 7, 2008

Menu:

Wednesday: Hamburgers, Pasta with Grilled Vegetables and Feta, Summer Salad
Thursday:
Friday:
Saturday:
Sunday:
Monday:
Tuesday:
Wednesday:

Grocery List:
Produce:
Bell Peppers
Red Onion
Cerry Tomatoes
Oregano

Grocery:
Penne Pasta

Meat:
Ground Bison

Dairy:
Feta Cheese


Frozen Foods:
Peaches
Rhubarb

Thursday, January 17, 2008

enchiladas were delicious as ever.
i believe i'm making enchiladas tonight for dinner. now i'm sitting here watching tv via netflix. I'm totally beyond crushing on a boy. thursday has been relatively good.

Monday, January 14, 2008

Menu 1/14/2008

Menu:
Monday: Mustard Roasted *Chicken*, Thyme-Roasted Sweet Potatoes
Tuesday: Enchiladas
Wednesday: Cake class night, I'll eat out
Thursday: Chicken in Pasta. Simple.
Friday: Potato, Spinach, Red Bell Pepper Salad with Warm Bacon Vinaigrette (hold the bacon)
Saturday: Probably Out.
Sunday: I'm not sure yet.

Last week was very overwhelming, and I didn't get to make most things on my list.
I'm reusing most of last week's recipes. No grocery list this week :-)

Gnocchi in review...

This was my first attempt at gnocchi, and I have to say that I was pretty impressed. In general I'm not a huge fan of gnocchi. I don't like it, and the last time I had it, I ended up having and allergic reaction to it. But things went much much better this time.
The ingredients needed for gnocchi are very simple. You need mashed potatoes, flour, salt, and an egg. There is a "correct" ratio of potatoes to flour, but I simply added enough flour until the potatoes and the egg came to the right texture to be rolled into snakes before being cut and shaped.
I skipped taking pictures of the rolling and the mixing because my hands were absolutely disgusting and I wasn't risking ruining my camera by doing that. Basically, I took baseball sized pieces of dough and rolled it out into a rope and cut it into small pieces. When cut the dough looks almost pillow shaped. I then dropped the gnocchi dough pillows into boiling water for 2 minutes or until it floated on top of the water. At this point I put it in ice water to stop the cooking then moved them to a cookie sheet to await further use. Once I was done I made a pink sauce, and dumped the gnocchi in.
Then I stirred it all together and let it simmer until Kristyn and Anne got here to eat. I think one of the best parts about it was that I let it simmer in the sauce, they got a good flavor from residing in the delicious pink sauce for so long.

Thursday, January 10, 2008

Tonight is Kristyn's birthday celebration and I'm making homemade gnocchi. I'm a bit excited about trying it.

But before I get to that, I have to comment on the Lemon and Herb Chicken with Roasted Potatoes and easy Caesar Salad. The chicken was amazing. I really liked it, it was super tender and flavorful. Very healthy because I didn't use any fat in it at all. However, the Caesar Salad was nearly inedible. It was far too lemony and garlicky. I am pretty sure it made my tongue tingle, and not in a good way.

Yesterday was my first cake decorating class. So far we haven't done anything for real, but we talked about our upcoming weeks. The teacher is very go with the flow, and she is into giving us the knowledge to do what we want to do with it. Most classes require that you make a rainbow cake your first week, a clown cake the second week, and a rose cake the third week. So it is kind of exciting to be able to learn what we want to learn and do something more our "style."

Kristyn and I have been discussing what kinds of cakes we're interested in making. I have been doing a ton of research on what I want my cakes to look like. As of right now I am planning on making a white square cake with teal circles. I'm looking for other ideas.
I have to go research some tips in making gnocchi!

Tuesday, January 8, 2008

Sometimes I'm just a bad person...

My plan for my day today was quite simple, do some work in the morning, followed by an early afternoon of birthday shopping for Kristyn. The morning started off that simple. I got up and I did a bunch of school work and then I did some IBM work. When I finished all the work that I had to do, I got cleaned up and went on my way.
I went to Downtown Crossing to DSW to see if they had the brown shoes by Sketchers that I want. They did, but they were $55! I couldn't justify that. Even with the $10 off coupon I have. I was a little annoyed because all the other shoes of the same style were $49. I walked around, browsing for a gift for Kristyn. I kind of was looking for a cute dress for her to wear to work, they had some at Banana Republic that I was interested in, but I didn't love any of them. I found one at H&M, but that one was black and white, and I would have preferred a color. I walked down to the Faneuil Hall area and continued to look. I stopped in Crate and Barrel to see if they had any fun kitchen supplies, but they didn't. I went to Victoria's Secret, and they are having their semi annual sale. I searched through the buckets of bras to find that they had one of the very sexy convertible bras that I adore. I bought it for myself.
I then went to look around Banana Republic and the Loft hoping to find something for Kristyn. Then I went up to the Gap and looked around. I found a green wrap dress that I thought she'd be interested in, but they didn't have her size. At the Gap, I saw that the Project (RED) shirts that I love were on sale. So I bought three for myself.


Aren't they cute? I'm actually wearing the blue one at the moment.

So that's my day. I went shopping for Kristyn and I ended up spending more than $50 on myself.

Tonight I'm going to make dinner for me and Anne, and then we're going to the movies, she wants to see Juno. I am feeling the need for some trivia...I'll have to look that up.